DOWNLOAD THE LATEST CONVERTER HERE
As I’ve been asked quite a bit to explain how the converter works, I told myself I’d write a short tutorial for those who can’t get it to work the way they’d want.
There are two ways of running the converter, either with the interactive interface or with command-line.
Using the UI
- First, you execute the convertpack.bat file by double-clicking it. You’ll get the following screen :

- There you can select which option you’d like to convert to. In this example I’ll use the 1.12 converter. Type 1 then press enter.

- You’ll now be asked to enter the path to the resource pack you wish to convert. This resource pack can be a .ZIP file or a folder containing the files (both are recognized by Minecraft). Please note if the path contains spaces, you are required to add quotes (“) around the path.
- Here is an example with a .ZIP file :

- Here is an example with a folder :

- In both cases, note I added quotes around the path. Next, you’ll be required to enter the path to the OUTPUT file (the converter will always generate a resource pack as .ZIP file). You should also add quotes should the path contain spaces. You should also remember to put the .ZIP extension to the file, otherwise Minecraft won’t recognize it as a legitimate resource pack file :

- Then the script will ask you to confirm the provided data is correct

- Press y then enter to confirm. The script will then start working.

- Occasionally you might get a message saying the temp folder is being cleaned up, this can happen if a previous execution of the script was stopped before the end :

- The script will display lines of text, some might seem like errors but don’t worry. When converting the script might expect some files to convert but some packs might be incomplete and lack some of those files, thus giving out an error. The output pack will still work.

- You can see here the first line being a “file not found” error, most probably because it tried converting a block to 1.12 that wasn’t already designed in Vanillaccurate. The script simply skips that entry.
You also see that the .ZIP file was generated in the specified folder. Just open your Windows Explorer and navigate to the folder you specified, and look for the .ZIP file. If you didn’t specify Minecraft resourcepack folder as output folder directly, you can then move the file there and start Minecraft to test the converted pack.
Upscaling or downscaling
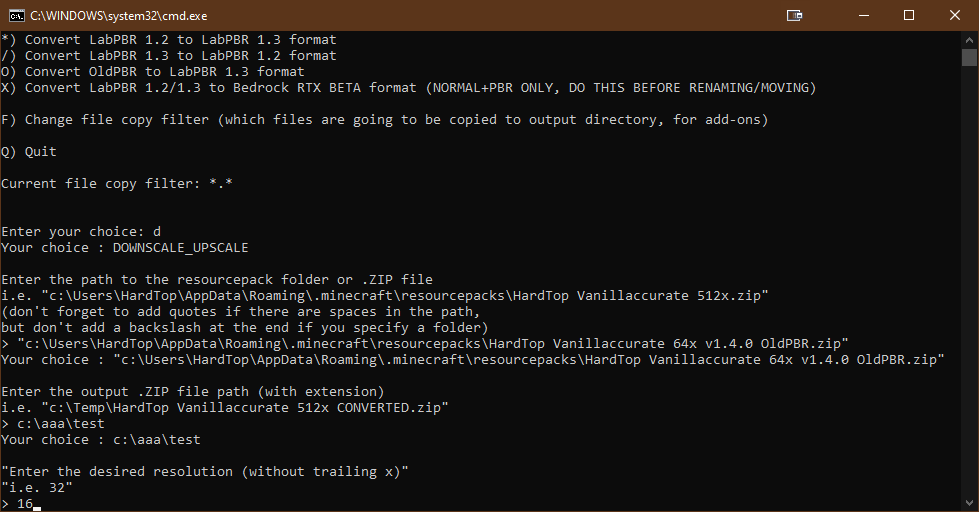
For upscaling/downscaling, here’s how you should proceed. Type d <enter> on the main menu.
Then as before, enter the source path (either folder or .ZIP), output file (as .ZIP), then you’ll be required to enter the resolution you want to downscale/upscale to. Enter a numeric value only, no trailing “x” or anything.

As before, you’ll be presented a confirmation screen…

If all went well, you’ll see this message after the script has completed. It may take a while.

Using the command-line options
The command-line format is as follows :
convertpack <format> <source_zip_or_folder> <destination_zip> <filter>
where :
- format represents the keyboard shortcut you’d use in the UI to select the format
i.e. p for LabPBR to OldPBR, o for OldPBR to LabPBR, 1 for 1.13 to 1.12 format. - source_zip_or_folder is the source pack, either as folder or zip file.
Don’t forget to add quotes if path contains spaces, and don’t end the path with a backslash if you specify a folder. - destination_zip is the full path to the converted pack, don’t forget to add .zip
- filter represents the files in the source pack to be considered for the conversion. Most of the time, you’ll use *.*
There it is, I hope it’s clear enough for you to convert your packs how you see fit ! Please note some conversions might be experimental (Renewed or PTGI) and based on personal tests for roughness or other specific parameters. Just test those for yourself and see if you like the results.
As always, don’t hesitate to contact me on the ShaderLabs discord.
Take care !
4 thoughts on “HardTop RP Converter tutorial”